No edit summary |
|||
| Line 48: | Line 48: | ||
==Locations== |
==Locations== |
||
| − | Traverse Town is similar to a Victorian-age town in terms of design and layout. It is divided into five major districts along with several minor locations such as alleyways, caves and a post office. Besides being created from fragments of destroyed worlds and serving as a home to those who's worlds have been destroyed by the Heartless, Traverse Town is also a great place to shop. |
+ | Traverse Town is similar to a Victorian-age town in terms of design and layout; however, the newer areas bear similarity to a modern town. It is divided into five major districts along with several minor locations such as alleyways, caves and a post office. Besides being created from fragments of destroyed worlds and serving as a home to those who's worlds have been destroyed by the Heartless, Traverse Town is also a great place to shop. |
===First District=== |
===First District=== |
||
| Line 55: | Line 55: | ||
There is also a shop run by Cid after the keyhole of Traverse Town is locked; he sells Gummi Blocks near the gate to the Second District. There is a restaurant with magical self-lighting candles to the left of the town entrance, as well as '''Geppetto's House''', a green-doored apartment that [[Geppetto]], [[Pinocchio]], and Cleo move into after they escape from Monstro. The mailbox used in the [[Postcard]] hunt is also found here, close to the door leading into the Third District. Directly across from the accessory shop is a large set of double-doors which serve as the entrance to the town and can return the player to the world map to choose another world to travel to. |
There is also a shop run by Cid after the keyhole of Traverse Town is locked; he sells Gummi Blocks near the gate to the Second District. There is a restaurant with magical self-lighting candles to the left of the town entrance, as well as '''Geppetto's House''', a green-doored apartment that [[Geppetto]], [[Pinocchio]], and Cleo move into after they escape from Monstro. The mailbox used in the [[Postcard]] hunt is also found here, close to the door leading into the Third District. Directly across from the accessory shop is a large set of double-doors which serve as the entrance to the town and can return the player to the world map to choose another world to travel to. |
||
| − | |||
===Second District=== |
===Second District=== |
||
[[File:Traverse Town Second District.PNG|thumb|The Second District.]] |
[[File:Traverse Town Second District.PNG|thumb|The Second District.]] |
||
The '''2nd District''' is infested with a variety of Heartless. Notable locations include the '''Gizmo Shop''' (a bell on the roof can eventually be rung three times in order to reveal the world's Keyhole), and the Dalmatians' House (consisting of '''Dalmatians' Den''', '''Living Room''', '''Dining Room''', and '''Piano Room'''), where [[Pongo]] and [[Perdita]] have settled due to the destruction of their world. |
The '''2nd District''' is infested with a variety of Heartless. Notable locations include the '''Gizmo Shop''' (a bell on the roof can eventually be rung three times in order to reveal the world's Keyhole), and the Dalmatians' House (consisting of '''Dalmatians' Den''', '''Living Room''', '''Dining Room''', and '''Piano Room'''), where [[Pongo]] and [[Perdita]] have settled due to the destruction of their world. |
||
| − | The Hotel is on the west side of the district and is often invaded by Heartless, but can be entered through the '''Hallway'''; in addition, the '''Red Room''' and '''Green Room''' are located within the Hotel, where Sora, [[Donald Duck|Donald]], and [[Goofy]] are briefed by Leon and Aerith. The east side of town includes the entrance to the Third District, as well as a set of roofs that can be climbed to reach treasures and a hidden entrance to a balcony in the Third District. At the back of the Hotel lies the '''Alleyway'''; it has passages to the Dalmatians' House and the First District, and its drainage pipes lead to the Secret Waterway. |
+ | The Hotel is on the west side of the district and is often invaded by Heartless, but can be entered through the '''Hallway'''; in addition, the '''Red Room''' and '''Green Room''' are located within the Hotel, where Sora, [[Donald Duck|Donald]], and [[Goofy]] are briefed by Leon and Aerith. The east side of town includes the entrance to the Third District, as well as a set of roofs that can be climbed to reach treasures and a hidden entrance to a balcony in the Third District. At the back of the Hotel lies the '''Alleyway'''; it has passages to the Dalmatians' House and the First District, and its drainage pipes lead to the '''Secret Waterway''', which houses Cid's special Navi-Gummi to get back to [[Hollow Bastion]] after the Final Keyhole is opened. |
The Mad Hatter from ''[[wikipedia:Alice in Wonderland (1951 film)|Alice in Wonderland]]'' is also seen moving his hat up and down on top of a store, dealing with suits and dresses. |
The Mad Hatter from ''[[wikipedia:Alice in Wonderland (1951 film)|Alice in Wonderland]]'' is also seen moving his hat up and down on top of a store, dealing with suits and dresses. |
||
| Line 71: | Line 70: | ||
The '''3rd District''' is a plaza also overrun with Heartless, but is one of the smallest along with the fifth district. [[File:Lady_and_the_Tramp_Fountain_KH.png|thumb|257px|The Lady and the Tramp Fountain.]]Notable areas include the '''Vacant House''' next to the Second District's door, which [[Leon]] and his crew eventually claim as the '''Small House''', their headquarters. The most notable feature in this district is the golden fountain in the corner of the lower area, which depicts an image from Disney's 1955 film, ''[[wikipedia:Lady and the Tramp|Lady and the Tramp]].'' |
The '''3rd District''' is a plaza also overrun with Heartless, but is one of the smallest along with the fifth district. [[File:Lady_and_the_Tramp_Fountain_KH.png|thumb|257px|The Lady and the Tramp Fountain.]]Notable areas include the '''Vacant House''' next to the Second District's door, which [[Leon]] and his crew eventually claim as the '''Small House''', their headquarters. The most notable feature in this district is the golden fountain in the corner of the lower area, which depicts an image from Disney's 1955 film, ''[[wikipedia:Lady and the Tramp|Lady and the Tramp]].'' |
||
| − | Casting [[Thunder]] on the exposed cable wire raises the platforms in the Second District Gizmo Shop. Finally, a keyhole next to the giant door to First District can also be found and unlocked for faster access to that area. In another corner, a short alley leads to a door with a flame on it that goes to the '''Mystical House''', and in turn the '''Magician's Study''' and '''Magician's Lab''' (also referred to as the "Zero District" by Merlin in ''[[Kingdom Hearts II]]''), where Merlin and the Fairy Godmother take up residence. The book that serves as the entrance to [[100 Acre Wood]] can also be found in the study. Below Merlin's house is the '''Secret Waterway''', which serves as Leon's secret training ground, as well as a back entrance to the Alleyway. |
+ | Casting [[Thunder]] on the exposed cable wire raises the platforms in the Second District Gizmo Shop. Finally, a keyhole next to the giant door to First District can also be found and unlocked for faster access to that area, saving the trouble of having to go through the Second District. In another corner, a short alley leads to a door with a flame on it that goes to the '''Mystical House''', and in turn the '''Magician's Study''' and '''Magician's Lab''' (also referred to as the "Zero District" by Merlin in ''[[Kingdom Hearts II]]''), where Merlin and the Fairy Godmother take up residence. The book that serves as the entrance to [[100 Acre Wood]] can also be found in the study. Below Merlin's house is the '''Secret Waterway''', which serves as Leon's secret training ground, as well as a back entrance to the Alleyway. |
| − | |||
| − | [[File:Fourth District 3D (Art).png|thumb|The Fourth District.]] |
||
===Fourth District=== |
===Fourth District=== |
||
| − | Home to '''Flick Rush Coliseum''', the Fourth District appears to be based on a more modern city than the other districts, which are victorian in effect. Many closed shops line the district, with a tower in the center (the building seen on the world map and in the photo next to this section) that has many lights hanging from it. Next to the Coliseum are the doors leading to the Fifth Distict, with the handles decorated with [[List of Dream Eaters|Hokomonkey]]'s face on them |
+ | Home to '''Flick Rush Coliseum''', the Fourth Di[[File:Fourth District 3D (Art).png|thumb|The Fourth District.]]strict appears to be based on a more modern city than the other districts, which are victorian in effect. Many closed shops line the district, with a tower in the center (the building seen on the world map and in the photo next to this section) that has many lights hanging from it. Next to the Coliseum are the doors leading to the Fifth Distict, with the handles decorated with [[List of Dream Eaters|Hokomonkey]]'s face on them. |
| + | |||
| + | The Fourth District can be reached by passing through the '''Fountain Plaza''', which houses an enormous fountain (which has a base shaped like a heart) and several more closed shops. Following one of the two paths, one can reach the '''Post Office''', which is a giant area filled with numerous boxes of unsent letters with many gadets and gizmos to help monover though it. At the end is an elevator that leads up to Mailbox in the First Distict. The second path leads to the '''Back Streets''', a series of winding and confusing streets that lead back to an entrance in the First Distict near the Cafe. |
||
===Fifth District=== |
===Fifth District=== |
||
| − | Reached soley from the '''Fourth Distirct''', the Fifth District is roughly the size of the '''Third Distirct'''. The entrance area has palm trees on the edges of the platform leading to bridge to cross of the stream of water. A '''Garden''' takes up most of the district, labled "Flower & Plant" while other buildings are unaccessible. There are two alleyways on either side, both empty; it |
+ | Reached soley from the '''Fourth Distirct''', the Fifth District is roughly the size of the '''Third Distirct'''. The entrance area has palm trees on the edges of the platform leading to bridge to cross of the stream of water. HTere's a sign on the other side of the bridge, but it cannot be read. A '''Garden''' takes up most of the district, labled "Flower & Plant" while other buildings are unaccessible as seen by the shut windows. There are two alleyways on either side, both empty; it's suggested the other buildings could be used as dwellings for residents of Traverse Town. The top of the Garden has a glass roof for letting sunlight in for the plants, at the back is a two-level wall, which is also below another large window. Inside the Garden is a large gate keeping anyone from going any deeper; this may lead to yet another area of the town, or leads to a small area where the entrances to the buildings lining the sides of the Fifth District are. The battle with Hokomonkey takes place here in Sora's story or within the Greenhouse, in Riku's case. It also houses the first sleeping Keyhole. |
==Story== |
==Story== |
||
Revision as of 16:06, 20 June 2013
Template:Game Template:World Traverse Town is the first major playable world that serves as the main hub of in Kingdom Hearts, Kingdom Hearts: Chain of Memories, Kingdom Hearts coded and Kingdom Hearts 3D: Dream Drop Distance. A quaint and calm town, Traverse Town features a sky of eternal night, where stars can be seen clearly. Survivors of the worlds lost to the Heartless find their way here after their world has been destroyed.
Leon, Yuffie, Aerith, Cid, Merlin, the Fairy Godmother, Pinocchio, and Geppetto are notable temporary residents. Huey, Dewey, and Louie own the item shop, while Cid owns the accessory shop and later sells Gummi Blocks to upgrade and modify Gummi Ships. Moogles also take residence here, where they successfully run a mysterious workshop. Merlin allows Sora to practice his magic on neutral targets, enter the Hundred Acre Wood, and the Fairy Godmother unlocks Summons after certain conditions are met.
Traverse Town consists of remnants of worlds whose hearts have been stolen by the Heartless, which is why anyone lucky enough to survive the destruction of their world ends up there.
As explained by Joshua, "this would only appears when someone is need of shelter"; Ienzo gives a similar explaination, saying anyone who is recompleted, but their world is unavailable, ends up here as well.
Locations
Traverse Town is similar to a Victorian-age town in terms of design and layout; however, the newer areas bear similarity to a modern town. It is divided into five major districts along with several minor locations such as alleyways, caves and a post office. Besides being created from fragments of destroyed worlds and serving as a home to those who's worlds have been destroyed by the Heartless, Traverse Town is also a great place to shop.
First District
The First District.
The 1st District is the most peaceful of the five, without the presence of Heartless (with the exception of the first episode, where Heartless can even be found here after Sora searches for Riku and Kairi, as well as in Kingdom Hearts 3D: Dream Drop Distance). The First District is where most survivors of the destroyed worlds can be found. The most notable locations include the Accessory Shop owned and managed by Cid, the Item Shop run by Huey, Dewey, and Louie, and an Item Workshop run by Moogles on the top floor of Cid's store.
There is also a shop run by Cid after the keyhole of Traverse Town is locked; he sells Gummi Blocks near the gate to the Second District. There is a restaurant with magical self-lighting candles to the left of the town entrance, as well as Geppetto's House, a green-doored apartment that Geppetto, Pinocchio, and Cleo move into after they escape from Monstro. The mailbox used in the Postcard hunt is also found here, close to the door leading into the Third District. Directly across from the accessory shop is a large set of double-doors which serve as the entrance to the town and can return the player to the world map to choose another world to travel to.
Second District
The Second District.
The 2nd District is infested with a variety of Heartless. Notable locations include the Gizmo Shop (a bell on the roof can eventually be rung three times in order to reveal the world's Keyhole), and the Dalmatians' House (consisting of Dalmatians' Den, Living Room, Dining Room, and Piano Room), where Pongo and Perdita have settled due to the destruction of their world.
The Hotel is on the west side of the district and is often invaded by Heartless, but can be entered through the Hallway; in addition, the Red Room and Green Room are located within the Hotel, where Sora, Donald, and Goofy are briefed by Leon and Aerith. The east side of town includes the entrance to the Third District, as well as a set of roofs that can be climbed to reach treasures and a hidden entrance to a balcony in the Third District. At the back of the Hotel lies the Alleyway; it has passages to the Dalmatians' House and the First District, and its drainage pipes lead to the Secret Waterway, which houses Cid's special Navi-Gummi to get back to Hollow Bastion after the Final Keyhole is opened.
The Mad Hatter from Alice in Wonderland is also seen moving his hat up and down on top of a store, dealing with suits and dresses.
The Keyhole for Traverse Town was hidden, but revealed only after the bell atop the Gizmo Shop tolled thrice (the bell can be accessed by climbing a ladder at the Gizmo Shop's exit, then by activating a Red Trinity mark to break down the barrier). The Keyhole is located in a fountain near the First District entrance. When the player approaches the Keyhole he/she will have to fight Guard Armor and Opposite Armor before sealing it off.
Inside the Shop there is a Trinity Mark. This can be accessed by using Thunder on the broken wires in the Third District. There are raised platforms in the Shop; the player should jump up on each to gain access to the Trinity Mark and some chests. After activating the Trinity Mark, the player should then examine the clock inside the Gizmo Shop; it is stuck at 6:54. The player will then gain two postcards.
Third District
The 3rd District is a plaza also overrun with Heartless, but is one of the smallest along with the fifth district.
The Lady and the Tramp Fountain.
Notable areas include the Vacant House next to the Second District's door, which Leon and his crew eventually claim as the Small House, their headquarters. The most notable feature in this district is the golden fountain in the corner of the lower area, which depicts an image from Disney's 1955 film, Lady and the Tramp.
Casting Thunder on the exposed cable wire raises the platforms in the Second District Gizmo Shop. Finally, a keyhole next to the giant door to First District can also be found and unlocked for faster access to that area, saving the trouble of having to go through the Second District. In another corner, a short alley leads to a door with a flame on it that goes to the Mystical House, and in turn the Magician's Study and Magician's Lab (also referred to as the "Zero District" by Merlin in Kingdom Hearts II), where Merlin and the Fairy Godmother take up residence. The book that serves as the entrance to 100 Acre Wood can also be found in the study. Below Merlin's house is the Secret Waterway, which serves as Leon's secret training ground, as well as a back entrance to the Alleyway.
Fourth District
Home to Flick Rush Coliseum, the Fourth Di
The Fourth District.
strict appears to be based on a more modern city than the other districts, which are victorian in effect. Many closed shops line the district, with a tower in the center (the building seen on the world map and in the photo next to this section) that has many lights hanging from it. Next to the Coliseum are the doors leading to the Fifth Distict, with the handles decorated with Hokomonkey's face on them.
The Fourth District can be reached by passing through the Fountain Plaza, which houses an enormous fountain (which has a base shaped like a heart) and several more closed shops. Following one of the two paths, one can reach the Post Office, which is a giant area filled with numerous boxes of unsent letters with many gadets and gizmos to help monover though it. At the end is an elevator that leads up to Mailbox in the First Distict. The second path leads to the Back Streets, a series of winding and confusing streets that lead back to an entrance in the First Distict near the Cafe.
Fifth District
Reached soley from the Fourth Distirct, the Fifth District is roughly the size of the Third Distirct. The entrance area has palm trees on the edges of the platform leading to bridge to cross of the stream of water. HTere's a sign on the other side of the bridge, but it cannot be read. A Garden takes up most of the district, labled "Flower & Plant" while other buildings are unaccessible as seen by the shut windows. There are two alleyways on either side, both empty; it's suggested the other buildings could be used as dwellings for residents of Traverse Town. The top of the Garden has a glass roof for letting sunlight in for the plants, at the back is a two-level wall, which is also below another large window. Inside the Garden is a large gate keeping anyone from going any deeper; this may lead to yet another area of the town, or leads to a small area where the entrances to the buildings lining the sides of the Fifth District are. The battle with Hokomonkey takes place here in Sora's story or within the Greenhouse, in Riku's case. It also houses the first sleeping Keyhole.
Story
Kingdom Hearts
After the destruction of Destiny Islands, Sora ends up in Traverse Town, while Donald and Goofy arrive at the same time through the use of a Gummi Ship. He is awakened by Pluto and ventures out into the town, searching for his friends. Upon searching the Second District, Sora sees a person have their heart taken by the Heartless and is chased back into the First District by them; he hides in the near-by Accessory Shop. There, he meets Cid, who he explains his situation to; Cid explains Traverse Town to Sora and offers to look after him if he can't find his friends.
Sora then leaves the First District again and ventures into the Second, searching for Riku and Kairi; humorously, Sora often leaves to enter or exit a building at the same time that Donald and Goofy enter, just barely missing them. Seeing that his friends are not in the Second District, Sora examines the smaller Third District to find no one there; he returns to Cid. Cid says he'll ask a friend of his to find a place for Sora to stay; he should stay in the First District to stay out of trouble.
Upon leaving Cid's shop, Sora runs into Leon, whom wonders why the Keyblade choose a kid as its master. Sora takes offense to Leon's remarks and starts a fight with him. Regardless of the outcome, Sora passes out while Yuffie arrives to help Leon carry Sora to somewhere safe.
In the meantime, Donald and Goofy have been looking for Leon, but have been unsuccessful in doing so; Aerith finds them and inquires if King Mickey sent them.
Elsewhere, Sora awakens in a hotel room to see Kairi next him, explaining that the Heartless were after him because he wields the Keyblade. However, Sora soon finds that he was hallucinating and that it is actually Yuffie explaining this to him. Leon enters from an adjacent room and helps Yuffie explain about the Keyblade along with the Heartless and the chaos caused by them. Next door, Aerith explains the same things to Donald and Goofy; it is also mentioned that a scientist called Ansem researched the Heartless and wrote a very detailed report on them. However, its pages were scattered to many worlds when theirs was destroyed.
Right as Leon prepares to take Sora next door to meet Donald and Goofy, a Soldier Heartless appears in the room, causing Leon to smash it through the window. Yuffie leaves to inform Aerith of what is happening, accidentally smashing Donald flat as a pancake behind the door. Leon leaves into the Alleyway, followed by Sora. In the meantime, Goofy pulls the door back to get Donald.
In the alley, Leon notices that there are too many Soldier and Shadow Heartless around for them to be attacking without a boss. Leon runs to defend the town from them, telling Sora not to worry about the small fry and to find their leader. As Sora enters the Third District, Donald and Goofy are blown off a balcony above, and land on him. The three battle and defeat numerous Soldier Heartless before being attacked by and defeating the Guard Armor.
Afterwards, Sora learns that Donald and Goofy have been looking for him on their king's orders. Goofy asks Sora to come with him and Donald as their Gummi Ship can go to other worlds. Sora wonders if he'll be able to find Riku and Kairi and Donald assures him that they will; Donald is actually lying, he needs Sora to help him find King Mickey. They properly introduce themselves and make a promise "all for one and one for all".
They later return after gaining two Navigation Gummis from Wonderland and Deep Jungle. They visit the Secret Waterway and learn from Leon the Heartless seek the Keyhole leading to the heart of each world; Sora's Keyblade can lock the Keyholes permanently, preventing more worlds from falling into darkness. However, Leon has no idea what the two Gummis are, recommending they ask Cid; he also gives Sora the Earthshine charm he has been using for good luck.
Arriving at the Accessory Shop, Sora, Donald and Goofy learn that the Gummis' purpose and Cid offers to instal them in exchange for delivering a certain book to Merlin. However, the sound of the Gizmo Shop bell ringing distracts them; Cid mentions that the bell hasn't rung in years, something he finds curious.
Sora, Donald and Goofy go to investigate the bell, ringing it three times, causing the image in the Second District fountain to change and reveal Traverse Town's Keyhole. They go to seal it, but are blocked by Guard Armor; it is swiftly defeated thanks to their journey strengthening them. However, the tables turn when the Heartless turns into Opposite Armor, proving a much more powerful foe, but it is still defeated. Sora then seals the Keyhole, earning yet another Navigation Gummi.
They then head to the Third District and find the Mystical House, where they meet Merlin, who thanks them for delivering the book to him; the book is lacking pages and they are asked to find them on their journey to help complete the world within it. Also, they meet Fairy Godmother, who explains that the gem Leon gave Sora is what remains of a strong-willed being that lost it's world to darkness, allowing Sora to Summon Simba.
After delivering the book (and if Sora enter the Hundred Acre Wood), they are ambushed in the Third District by Heartless, which are slain quickly by, much to Sora's surprise, Riku. Sora is happy to be reunited with Riku, but learns he doesn't know where Kairi is either. Riku tries to explain something, but is cut off when Sora slays a Shadow. Sora explains his journey to find him and Kairi with Donald and Goofy's help. Riku then takes the Keyblade, examining it and quickly tosses it back to Sora. When Sora tries to invite Riku to come with them, he and Donald get into an argument; when they look back to see Riku's gone.
They later meet up with Leon, Yuffie, Cid and Aerith in their base and learn about Maleficent; she's a witch who controls the Heartless and is the one responsible for them infesting the town and the destruction of their world. They believe she is collecting Ansem's report to help in her schemes; Sora offers to do whatever he can to stop her. Outside the base, Riku and Maleficent are looking in; she fills his head with lies, making Riku think Sora has replaced him and Kairi with new friends. She then offers to help Riku find Kairi.
They return once again, right after sealing Neverland with the second Navigation Gummi and have it installed along with the other one previous obtained. During this time, Sora begins to doubt himself as they have had no luck in finding King Micky or finding Kairi; Donald and Goofy tell him to believe in himself. Sora then has a vision; he sees a young Kairi listening to her grandmother about a story of how darkness came into existence. Sora then regains his senses, Cid has returned after installing the new Gummi, wishing them luck.
Sora, Donald and Goofy return one last time, right after Sora is changed back from a Heartless. Sora is determined to get back to Hollow Bastion to save Riku, but the way they used the first time is too infested with Heartless for them to go that way; Cid offers a spare Gummi he stored in the Secret Waterway. When Sora goes to retrieve it, he meets up with Kairi, who notices where the Gummi is stored. After getting the Gummi, Sora talks to Kairi about how he searched for her, but she was with him the whole time. He then manages to persuade her to remain behind to stay safe; in return, Kairi gives him her lucky charm.
When the worlds are restored after the defeat of Ansem, Traverse Town was no longer need, so it fell into the Dreaming Realm, where it would stay until needed again.
Kingdom Hearts: Chain of Memories
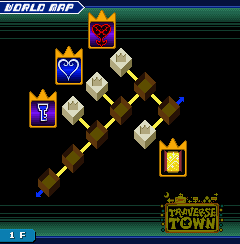

Traverse Town World Map in Chain of Memories.
A memory-created version of Traverse Town is the first world Sora visits while in Castle Oblivion and is the only one that the trio seem to remember from their journey (as they don't seem to remember anyone else). Upon it's creation, Marluxia explains the rules of combat and proceeding through the castle floors to Sora.
They later meet up with Leon, Yuffie, and Aerith, who doesn't seem to remember Sora, Donald and Goofy; however, they know their names and feel like they've meet them before. Also, Leon teaches Sora about Sleights when they first encounter each other.
Up searching to see if Riku and King Mickey are in "Traverse Town", they run into Cid, who also doesn't remember them; he warns them that a "jumbo" Heartless will appear when the bell above the Gizmo Shop rings. After Cid flees, the bell begins ringing, summoning Guard Armor to face the trio.
After the battle, Sora deduces that they won't be able to find Riku and the King in Traverse Town, but thinks they still may be somewhere in Castle Oblivion. Though everyone doesn't understand Sora's situation, they wish him luck and leave. However, Aerith returns briefly and tells Sora that she and everyone else may be nothing but a figment in Sora's memory (as Sora explained how he got to Traverse Town previously). It is proven true when Donald distracts Sora momentarily and she is not there when he looks back; Donald and Goofy couldn't see her. Sora now believes Aerith was right.
Kingdom Hearts 358/2 Days
Although Traverse Town is not a playable world, the world is sometimes displayed when Roxas has flashbacks of Sora's memories.
Kingdom Hearts II
While Traverse Town does not appear, it is frequently mentioned and shown in Sora's memory restoration. Merlin claims that he retrieved Winnie the Pooh's storybook out of the town's Zero District, and it is mentioned several times in the Secret Ansem Reports.
Kingdom Hearts coded
A Traverse Town within the Datascape appears that the first district is no longer peaceful, as a battle against numerous Heartless and "bugs" is witnessed. In episode 2, Data-Sora wakes up by Data Pluto in Traverse Town, like in the first game. King Mickey tells Data-Sora to investigate this world. While he was investigating, he meets Data Cid. Cid is trying to find Data Huey, Dewey, and Louie, whom Data-Sora manages to find. Each of them had found a shiny piece, which together almost form a Keyhole.
Data-Sora then meets a black coated man who gives him the 4th piece of the Keyhole. Later, Mickey tells him that the Keyhole probably leads to the corrupted place, similar to the time in Destiny Islands. Data-Sora then opens it with his Keyblade which leads him to another space in Traverse Town. He was running and encountered lots of blocks. He continued to run through the area and encountered a Guard Armor, having to fight it. After Data-Sora beats Guard Armor, he fixes Traverse Town and a new power awakens inside of him. Meanwhile, in the real Disney Castle, a new message appeared, saying "Their torment has been lessened".
Kingdom Hearts 3D: Dream Drop Distance
Template:Spoiler Because the existences of his friends were in danger of blinking out for good, Joshua gathered what remained of their dreams and brought them here. Much to his surprise, the dreams of his friends took bodily form, thus bringing them back to life. He decided to house the Reaper's Game here to allow his friends to win back their existences and return to their home, Shibuya. However, the world was split in two by Young Xehanort, seperating Neku, Shiki, Beat, and Rhyme from their correct Reaper Game partners; Neku and Rhyme were in one version while Shiki and Beat were in the other. Young Xehanort made a deal with the players: bring him Sora and/or Riku, and he'll send them back home.
First visit
Sora arrives in the First District, discovering his new attire. Neku finds him and leads him to the Second District, where they're attacked by Dream Eaters. After showing Sora how to create a Dream Eater, Neku leads him to the Third Districts to collect on his deal. However, Young Xehanort appeared to double-cross Neku, attempting to attack Sora. Sora fell asleep while Neku fought him, before awoke later to find them both gone. Once Sora navigated his way to the new areas of Traverse Town, he meets an amnesiac Rhyme, whom he believes could be Neku's Game Partner. Meeting Neku once more, Sora forgives him just as Rhyme vanishes; Young Xehanort had returned and left Hokomonkey to deal with them. Victorious, Sora meets Joshua, who teleported there from a second version of Traverse Town, which is where Riku is, and learns he saved Rhyme by making her vanish. However, because the portal Joshua has only works for him, Sora is unable to get to Riku.
Riku arrives in Third District, meeting Joshua. After some initial distrust, Riku agrees to help him find Rhyme. When they go to the Second District and Riku learns how to create Dream Eaters, they are attacked by Beat, who has been tricked by Young Xehanort. However, after giving Beat a beating, Riku falls asleep, only to awaken later to find Shiki being attacked by Dream Eaters. Saving her, Riku accompanies her to the Fifth District, where he learns of her deal with Yougn Xehanort. The egnagmatic being wonders how Riku got into Sora's dreams, which is where he is, but puts the matter aside, sending Hokomonkey to attack him. After coming out victorious, Riku sees a hologram of Sora, Neku, Rhyme and Joshua in the other Traverse Town.
With both sides of the Traverse Town story done now, Joshua takes his friends "off line", revealing what happened to them and his plans to save them. Both Riku and Sora are left wondering who he is. Joshua gives a cryptic response and flies off into the sky. A keyhole appears before Sora and Riku; they unlock it.
Second visit
Sora and Riku are called back to their versions of Traverse Town by Joshua; the Players of the Reaper's Game have been sent to their proper game partners, but their task, eliminating Spellican, is proving too difficult for them, so they were summoned to help. Sora, who arrived in the Fifth District, is sent to the Fountain Plaza to help Neku and Shiki fight it, but it vanishes to the other Traverse Town. Riku, who arrives in the First District, heads to the Fountain Plaza to fight it with Beat and Rhyme; they anger it by not paying attention. It flies to the Third Districtr, with Riku giving chase. Cornered, the Spellican goes back to Sora's version of Traverse Town, only to be given a sound beating. Fearing defeat, the Dream Eater flees to another world in the Dreaming Realm.
Riku is thanked by Joshua, Rhyme and Beat, but given a warning; Traverse Town may be a dream within a dream because both versions have a different flow of time. Sora is also thanked by Shiki, Neku and Joshua, who invite him to come to Shibuya in the future. Both Sora and Riku unlock a Keyhole and continue their journey.
Third visit
Following his failure in the Mark of Master Exam, Sora returns to an empty Traverse Town, hoping that the Spirit variety of Dream Eaters would be there to greet him. At first, none are there. However, Meow Wow, Kooma Panda, Fruitz Kat and many others arrive, surrounding him. Sora laughs with joy. His happiness reaches Ventus' comatose body within Castle Oblivion, making him smile.
Template:Spoilerend
Characters
|


Enemies
Heartless
.png "Shadow (KHII).png (36 KB)")
")
.png "Large Body (KHII).png (91 KB)")
")
")
")
Nobodies
")
.png)
_KH_3D.png)
Dream Eaters
Somebodies
Shops
Cid's Accessory Shop
- Protect Chain - 150 munny
- Fire Ring - 250 munny
- Blizzard Ring - 250 munny
- Thunder Ring - 250 munny
- Ability Stud - 200 munny
- Protera Chain - 750 munny
- Fira Ring - 1000 munny
- Blizzara Ring - 1000 munny
- Thundara Ring - 1000 munny
- Chaos Ring - 600 munny
- Protega Chain - 2800 munny
- Firaga Ring - 4000 munny
- Blizzaga Ring - 4000 munny
- Thundaga Ring - 4000 munny
- Element Ring - 4800 munny
Huey, Dewey, and Louie's Item Shop
Items
- Potion - 25 munny
- Hi-Potion - 60 munny
- Ether - 100 munny
- Tent - 150 munny
- Camping Set - 300 munny
Donald's weapons
- Morning Star - 150 munny
- Shooting Star - 300 munny
- Magus Staff - 1000 munny
- Wisdom Staff - 4000 munny
- Warhammer - 250 munny
- Silver Mallet - 1000 munny
- Grand Mallet - 4000 munny
Goofy's weapons
- Smasher - 250 munny
- Gigas Fist - 1000 munny
- Mythril Shield - 750 munny
- Onyx Shield - 2800 munny
- Stout Shield - 250 munny
- Golem Shield - 1000 munny
- Adamant Shield - 4000 munny
Synthesis Shops
- Set 1: Cottage, Elixir, Energy Bangle, Power Chain, Guard Earring, Dark Ring
- Set 2: Mega Potion, AP Up, Angel Bangle, Magic Armlet, Golem Chain, Master Earring
- Set 3: Mega-Ether, Defense Up, Gaia Bangle, Rune Armlet, Heartguard, Three Stars
- Set 4: Megalixir, Power Up, Titan Chain, Atlas Armlet, Crystal Crown, Ribbon
- Set 5: Ultima Weapon
Treasure list
| Type | Items Found | Locations | Notes |
|---|---|---|---|
| Regular | Elixir | Green Room | Talk to Yuffie. |
| Mega-Potion x 2 | Second District/ First District | On awning of Gizmo Shop/Talk to Aerith after 1st battle with Guard Armor | |
| Potion x 2 | Alleyway x 2 | On balcony of the farthest Hotel room, near the entrance. | |
| Power-Ups | Defense Up | First District | Extinguish all candles in cafe. |
| Synthesis | Mythril Shard x 3 | Second District, Accessory Shop, Synthesis Shop | On buildings after crossing from the top of Gizmo Shop. |
| Mythril | Green Room | Examine both paintings in Hotel, ring bell on counter, and then attack the clock in the Green Room until two chimes are heard. | |
| Special | Wishing Star | Geppetto's House | After completing Monstro. |
| Pretty Stone x 2 | Alleyway, Red Room | On small awning near entrance of Alleyway. |
| Boss | Location | Reward |
|---|---|---|
| Leon | First District | Elixir |
| Guard Armor | Third District | Brave Warrior |
| Opposite Armor | Second District | Aero, Navi-G Piece |
Mini-Games
Traverse Town includes a side quest to collect different postcards scattered throughout the town. By storing them in the post vault in the First District, Sora will receive different rewards for each postcard stored.
Puppies
- 1, 2, & 3 - On the tiny island behind the Mystical House. Glide is required.
- 4, 5, & 6 - Behind the tall stack of crates in the Back Alley. Red Trinity or High Jump is required.
- 7, 8, & 9 - In the Moogle Synthesis Shop on the table.
- 10, 11, & 12 - In the Secret Waterway, just inside the door leading to the stairs.
Trinity marks
| Type | Location | Notes | Reward |
|---|---|---|---|
| Blue | First District | In front of the restaurant tables. | Transported to balcony with Postcard in chest. |
| First District | In the left corner near the world exit. | 75-99 munny | |
| Third District | In the alley running behind the Lady and the Tramp fountain. | 99 munny and Camping Set | |
| Magician's Study | On the floor near the main entrance. | ? munny and Mega-Ether | |
| Red | First District | At the end of the short alley behind the Item Shop. | Opens access to Alleyway and 99 Puppies chest. |
| Alleyway | On the drainage grate on the end of the alley near the Dalmatian's House. | Access to Secret Waterway | |
| Second District | On top of the Gizmo Shop roof in Second District, along the back wall. | Access to bell which reveals Keyhole. | |
| Green | Accessory Shop | In the middle of the floor. | Lowers ladder to Synthesis Shop. |
| Yellow | Mystical House | In the back of the house, on the stack of crates. | Access to Power Up. |
| White | Secret Waterway | In the middle of the passage, where the short tunnel connects with the main tunnel. | Orichalcum |
Trivia
- In Dream Drop Distance, poles appear in the Second District right below the right entrance to the Hotel.
- Also in Dream Drop Distance, in the Fountain Plaza there is a wall with graffiti from "The World Ends With You" which is where new Traverse Town characters are from.
- Ironicly, the Fountain Plaza is large enough to be a district, but isn't one.
Gallery
")
")
")
Notes and references
Template:KH1 Template:COM
Template:WorldDirectory