(Replaced content with "Ride on it, baby. http://img833.imageshack.us/img833/7811/twink5375.jpg Category:Kingdom Hearts 358/2 Days Category:Game elements") |
Evnyofdeath (talk | contribs) (Undo revision 406139 by 190.76.19.110 (talk)) |
||
| Line 1: | Line 1: | ||
| + | {{Game|358}} |
||
| − | Ride on it, baby. |
||
| + | {{Images|ability and material icons; tutorial pages}} |
||
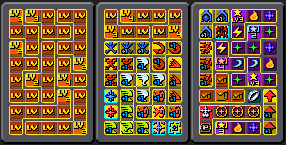
| + | [[File:Panel2.png|thumb|286px|An optimal Panel setup.]] |
||
| + | The '''Panel System''' is the system in ''[[Kingdom Hearts 358/2 Days]]'' through which the members of [[Organization XIII]] upgrade weapons and stats, equip armor and accessories, gain abilities, and use [[Magic]]. |
||
| + | ==Description== |
||
| − | http://img833.imageshack.us/img833/7811/twink5375.jpg |
||
| + | The panels fit into a grid, which gains more slots by obtaining Slot Releasers. The grid can only contain one weapon panel and one ring panel. Otherwise, you can place as many of every other type as you wish (provided that they fit in the grid). |
||
| + | |||
| + | Each panel may take up a different amount of slots. These panels always have link slots, where certain panels can be placed to "link" with the main panel. For instance, if you place a Doublecast ④ panel, it takes up four spaces, three of which can have panels placed in. In this case, magic would be placed in the empty spaces, allowing you to cast each of those spells two times. |
||
| + | |||
| + | Weapon panels link with unit panels, which can have a variety of effects, from unlocking the abilities of the weapon, to increasing the weapon's attack, to increasing the chance of critical hits. Magic panels give you one cast for however many number of that magic you have equipped (if you have three Fire panels equipped, then you can cast Fire three times). When you have run out of casts, you must use an [[Ether]] to replenish them. Ability panels give you many abilities, such as [[Dodge Roll]], [[Glide]], and [[High Jump]]. Item panels can be equipped, but disappear when the item is used in the field. Level Up panels must be equipped in order to increase your level, and can be linked with certain panels to double, triple, or quadruple the level of the panels linked to it. Material panels aren't meant for use in the grid. By collecting material panels, you can use them at the shop to synthesize new panels. |
||
| + | |||
| + | ==List of Panels== |
||
| + | ===Item Panels [[File:DaysItem.png]]=== |
||
| + | * [[File:DaysPotion.png]] [[Potion]] |
||
| + | * [[File:DaysHi-Potion.png]] [[Hi-Potion]] |
||
| + | * [[File:DaysMega-Potion.png]] [[Mega-Potion]] |
||
| + | * [[File:DaysEther.png]] [[Ether]] |
||
| + | * [[File:DaysHi-Ether.png]] [[Hi-Ether]] |
||
| + | * [[File:DaysMega-Ether.png]] [[Mega-Ether]] |
||
| + | * [[File:DaysElixir.png]] [[Elixir]] |
||
| + | * [[File:DaysMegalixir.png]] [[Megalixir]] |
||
| + | * [[File:DaysUltralixir.png]] [[Panacea]] |
||
| + | * [[File:Limit Recharge.png]] [[Limit Recharge]] |
||
| + | |||
| + | ===Support Panels [[File:DaysArmor.png]]=== |
||
| + | *[[File:Level Up.png]] [[Level Up]] |
||
| + | *[[File:LV Doubler.png]] [[LV Doubler ⑤]], [[LV Doubler ⑥]] (four configurations) |
||
| + | *[[File:LV Tripler.png]] [[LV Tripler ④]] (three configurations) |
||
| + | *[[File:LV Quadrupler.png]] [[LV Quadrupler ③]] (three configurations) |
||
| + | *[[File:Backpack.png]] [[Backpack]] |
||
| + | *[[File:Pack Extender.png]] [[Pack Extender|Pack Extender ④]] |
||
| + | |||
| + | ===Magic Panels [[File:DaysMagic.png]]=== |
||
| + | :''See [[Magic Panel]] and [[Magic]] for more information.'' |
||
| + | * [[File:DaysFire.png]] [[Fire]] |
||
| + | * [[File:DaysFira.png]] [[Fira]] |
||
| + | * [[File:DaysFiraga.png]] [[Firaga]] |
||
| + | * [[File:DaysBlizzard.png]] [[Blizzard]] |
||
| + | * [[File:DaysBlizzara.png]] [[Blizzara]] |
||
| + | * [[File:DaysBlizzaga.png]] [[Blizzaga]] |
||
| + | * [[File:DaysThunder.png]] [[Thunder]] |
||
| + | * [[File:DaysThundara.png]] [[Thundara]] |
||
| + | * [[File:DaysThundaga.png]] [[Thundaga]] |
||
| + | * [[File:DaysAero.png]] [[Aero]] |
||
| + | * [[File:DaysAerora.png]] [[Aerora]] |
||
| + | * [[File:DaysAeroga.png]] [[Aeroga]] |
||
| + | * [[File:DaysCure.png]] [[Cure]] |
||
| + | * [[File:DaysCura.png]] [[Cura]] |
||
| + | * [[File:DaysCuraga.png]] [[Curaga]] |
||
| + | * [[File:Magic LV2.png]] [[Magic LV2 ④]] (three configurations) |
||
| + | * [[File:Magic LV3.png]] [[Magic LV3 ④]] (two configurations) |
||
| + | * [[File:Magic LV4.png]] [[Magic LV4 ④]] (one configuration) |
||
| + | * [[File:Doublecast.png]] [[Doublecast ④]] |
||
| + | * [[File:Triplecast.png]] [[Triplecast ③]] |
||
| + | * [[File:Quadcast.png]] [[Quadcast ③]] |
||
| + | |||
| + | ===Ability Panels [[File:DaysAbility.png]]=== |
||
| + | :''See [[:Category:Kingdom Hearts 358/2 Days abilities|Kingdom Hearts 358/2 abilities]] for more information.'' |
||
| + | *[[File:DaysDodge Roll.png]] [[Dodge Roll]], [[Dodge Roll ③]] |
||
| + | **[[File:DaysDodge Roll LV+.png]] [[Dodge Roll LV+ Ⓛ]] |
||
| + | **[[File:Dodge Rush.png]] [[Dodge Rush Ⓛ]] |
||
| + | **[[File:Dodging Deflect.png]] [[Dodging Deflect Ⓛ]] |
||
| + | **[[File:Dodge Combo.png]] [[Dodge Combo Ⓛ]] |
||
| + | **[[File:Auto-Dodge.png]] [[Auto-Dodge Ⓛ]] |
||
| + | *[[File:DaysBlock.png]] [[Block ②]], [[Block ④]] |
||
| + | **[[File:DaysBlock LV+.png]] [[Block LV+ Ⓛ]] |
||
| + | **[[File:Perfect Block.png]] [[Perfect Block Ⓛ]] |
||
| + | **[[File:Block-Counter.png]] [[Block-Counter Ⓛ]] |
||
| + | **[[File:Block-Retreat.png]] [[Block-Retreat Ⓛ]] |
||
| + | **[[File:Sliding Block.png]] [[Sliding Block Ⓛ]] |
||
| + | **[[File:Block-Jump.png]] [[Block-Jump Ⓛ]] |
||
| + | **[[File:Fire Block.png]] [[Fire Block Ⓛ]] |
||
| + | **[[File:Blizzard Block.png]] [[Blizzard Block Ⓛ]] |
||
| + | **[[File:Thunder Block.png]] [[Thunder Block Ⓛ]] |
||
| + | **[[File:Aero Block.png]] [[Aero Block Ⓛ]] |
||
| + | **[[File:Block Bonus.png]] [[Bonus Block Ⓛ]] |
||
| + | **[[File:Round Block.png]] [[Round Block Ⓛ]] |
||
| + | **[[File:Auto-Block.png]] [[Auto-Block Ⓛ]] |
||
| + | *[[File:DaysAerial Recovery.png]] [[Aerial Recovery]], [[Aerial Recovery ③]] |
||
| + | **[[File:A. Recovery LV+.png]] [[A. Recovery LV+ Ⓛ]] |
||
| + | **[[File:Quick Recovery.png]] [[Quick Recovery Ⓛ]] |
||
| + | **[[File:Aerial Payback.png]] [[Aerial Payback Ⓛ]] |
||
| + | **[[File:Smash Recovery.png]] [[Smash Recovery Ⓛ]] |
||
| + | *[[File:DaysAir Slide.png]] [[Air Slide ②]], [[Air Slide ⑤]] |
||
| + | **[[File:Air Slide LV+.png]] [[Air Slide LV+ Ⓛ]] |
||
| + | **[[File:Air Rush.png]] [[Air Rush Ⓛ]] |
||
| + | *[[File:DaysSliding Dash.png]] [[Sliding Dash]], [[Sliding Dash ③]] |
||
| + | **[[File:Sliding Dash LV+.png]] [[Sliding Dash LV+ Ⓛ]] |
||
| + | *[[File:DaysGlide.png]] [[Glide ③]], [[Glide ⑤]] |
||
| + | **[[File:Glide LV+.png]] [[Glide LV+ Ⓛ]] |
||
| + | **[[File:Homing Glide.png]] [[Homing Glide Ⓛ]] |
||
| + | **[[File:Rocket Glide.png ]] [[Rocket Glide Ⓛ]] |
||
| + | *[[File:Haste.png]] [[Haste]], [[Haste ③]] |
||
| + | **[[File:Haste LV+.png]] [[Haste LV+ Ⓛ]] |
||
| + | *[[File:High Jump.png]] [[High Jump]], [[High Jump ③]] |
||
| + | **[[File:High Jump LV+.png]] [[High Jump LV+ Ⓛ]] |
||
| + | **[[File:Float.png]] [[Float Ⓛ]] |
||
| + | *[[File:Treasure Magnet.png]] [[Treasure Magnet]], [[Treasure Magnet ③]] |
||
| + | **[[File:T. Magnet LV+.png]] [[T. Magnet LV+ Ⓛ]] |
||
| + | *[[File:Auto-Life.png]] [[Auto-Life ③]] |
||
| + | **[[File:Auto-Life LV+.png]] [[Auto-Life LV+ Ⓛ]] |
||
| + | *[[File:Limit Boost.png]] [[Limit Boost]] |
||
| + | *[[File:Final Limit.png]] [[Final Limit]] |
||
| + | *[[File:DaysScan.png]] [[Scan]] |
||
| + | *[[File:Range Extender.png]] [[Range Extender]] |
||
| + | *[[File:Auto-Lock.png]] [[Auto-Lock]] |
||
| + | *[[File:Ultima Weapon.png]] [[Ultima Weapon (ability)|Ultima Weapon]] |
||
| + | |||
| + | ===Weapon Panels [[File:DaysGear.png]] === |
||
| + | :''See [[Gear]] for more information.'' |
||
| + | * [[File:Skill Gear.png]] [[Skill Gear]], [[Skill Gear+ ②]] |
||
| + | * [[File:Technical Gear.png]] [[Technical Gear ③]], [[Technical Gear+ ③]] |
||
| + | * [[File:Duel Gear.png]] [[Duel Gear ④]], [[Duel Gear+ ④]], [[Duel Gear++ ⑤]] |
||
| + | * [[File:Loaded Gear.png]] [[Loaded Gear]], [[Loaded Gear+ ②]] |
||
| + | * [[File:Chrono Gear.png]] [[Chrono Gear ③]], [[Chrono Gear+ ③]] |
||
| + | * [[File:Phantom Gear.png]] [[Phantom Gear ④]], [[Phantom Gear+ ④]], [[Phantom Gear++ ⑤]] |
||
| + | * [[File:Lift Gear.png]] [[Lift Gear ③]], [[Lift Gear+ ③]] |
||
| + | * [[File:Nimble Gear.png]] [[Nimble Gear ④]], [[Nimble Gear+ ④]] |
||
| + | * [[File:Wild Gear.png]] [[Wild Gear ③]], [[Wild Gear+ ③]] |
||
| + | * [[File:Ominous Gear.png]] [[Ominous Gear ④]], [[Ominous Gear+ ④]] |
||
| + | * [[File:Valor Gear.png]] [[Valor Gear ②]], [[Valor Gear+ ②]] |
||
| + | * [[File:Fearless Gear.png]] [[Fearless Gear ③]], [[Fearless Gear+ ③]] |
||
| + | * [[File:Prestige Gear.png]] [[Prestige Gear ④]], [[Prestige Gear+ ④]] |
||
| + | * [[File:Crisis Gear.png]] [[Crisis Gear ⑤]], [[Crisis Gear+ ⑤]] |
||
| + | * [[File:Omega Gear.png]] [[Omega Gear ⑥]], [[Omega Gear+ ⑥]] |
||
| + | * [[File:Hazard Gear.png]] [[Hazard Gear ⑤]], [[Hazard Gear+ ⑤]] |
||
| + | * [[File:Rage Gear.png]] [[Rage Gear ⑤]], [[Rage Gear+ ⑤]] |
||
| + | * [[File:Champion Gear.png]] [[Champion Gear ⑤]], [[Champion Gear+ ⑤]] |
||
| + | * [[File:Ultimate Gear.png]] [[Ultimate Gear ⑥]], [[Ultimate Gear+ ⑥]] |
||
| + | * [[File:Pandora's Gear.png]] [[Pandora's Gear ⑤]], [[Pandora's Gear+ ⑤]] |
||
| + | * [[File:Zero Gear.png]] [[Zero Gear ⑤]] |
||
| + | * [[File:Casual Gear.png]] [[Casual Gear ②]] |
||
| + | * [[File:Mystery Gear.png]] [[Mystery Gear ③]] |
||
| + | * [[File:DaysAbility Unit.png]] [[Ability Unit Ⓛ]] |
||
| + | * [[File:DaysPower Unit.png]] [[Power Unit Ⓛ]] |
||
| + | * [[File:DaysMagic Unit.png]] [[Magic Unit Ⓛ]] |
||
| + | * [[File:DaysGuard Unit.png]] [[Guard Unit Ⓛ]] |
||
| + | * [[File:DaysSight Unit.png]] [[Sight Unit Ⓛ]] |
||
| + | |||
| + | ===Ring Panels [[File:DaysAccessory.png]]=== |
||
| + | :''See [[Accessory]] for more information.'' |
||
| + | *[[File:DaysAcessory.png]] [[Sign of Resolve]] |
||
| + | *[[File:DaysAcessory.png]] [[Brawl Ring]] |
||
| + | *[[File:DaysAcessory.png]] [[Magic Ring]] |
||
| + | *[[File:DaysAcessory.png]] [[Soldier Ring]] |
||
| + | *[[File:DaysAcessory.png]] [[Fencer's Ring]] |
||
| + | *[[File:DaysAcessory.png]] [[Fire Charm]] |
||
| + | *[[File:DaysAcessory.png]] [[Flower Charm]] |
||
| + | *[[File:DaysAcessory.png]] [[Strike Ring]] |
||
| + | *[[File:DaysAcessory.png]] [[Lucky Ring]] |
||
| + | *[[File:DaysAcessory.png]] [[Blizzard Charm]] |
||
| + | *[[File:DaysAcessory.png]] [[White Ring]] |
||
| + | *[[File:DaysAcessory.png]] [[Knight's Defense]] |
||
| + | *[[File:DaysAcessory.png]] [[Raider's Ring]] |
||
| + | *[[File:DaysAcessory.png]] [[Thunder Charm]] |
||
| + | *[[File:DaysAcessory.png]] [[Recovery Ring]] |
||
| + | *[[File:DaysAcessory.png]] [[Vitality Ring]] |
||
| + | *[[File:DaysAcessory.png]] [[Rainforce Ring]] |
||
| + | *[[File:DaysAcessory.png]] [[Double Up]] |
||
| + | *[[File:DaysAcessory.png]] [[Storm's Eye]] |
||
| + | *[[File:DaysAcessory.png]] [[Critical Ring]] |
||
| + | *[[File:DaysAcessory.png]] [[Fairy Circle]] |
||
| + | *[[File:DaysAcessory.png]] [[Full Circle]] |
||
| + | *[[File:DaysAcessory.png]] [[Lucky Star]] |
||
| + | *[[File:DaysAcessory.png]] [[Charge Ring]] |
||
| + | *[[File:DaysAcessory.png]] [[Eternal Ring]] |
||
| + | *[[File:DaysAcessory.png]] [[Carmine Blight]] |
||
| + | *[[File:DaysAcessory.png]] [[Frozen Blight]] |
||
| + | *[[File:DaysAcessory.png]] [[Safety Ring]] |
||
| + | *[[File:DaysAcessory.png]] [[Princess's Crown]] |
||
| + | *[[File:DaysAcessory.png]] [[Lunar Strike]] |
||
| + | *[[File:DaysAcessory.png]] [[Crimson Blood]] |
||
| + | *[[File:DaysAcessory.png]] [[Deep Sky]] |
||
| + | *[[File:DaysAcessory.png]] [[Protect Ring]] |
||
| + | *[[File:DaysAcessory.png]] [[Might Crown]] |
||
| + | *[[File:DaysAcessory.png]] [[Critical Sun]] |
||
| + | *[[File:DaysAcessory.png]] [[Three Stars]] |
||
| + | *[[File:DaysAcessory.png]] [[Imperial Crown]] |
||
| + | *[[File:DaysAcessory.png]] [[Witch's Chaos]] |
||
| + | *[[File:DaysAcessory.png]] [[Rune Ring]] |
||
| + | *[[File:DaysAcessory.png]] [[Extreme]] |
||
| + | *[[File:DaysAcessory.png]] [[Master's Circle]] |
||
| + | *[[File:DaysAcessory.png]] [[Nothing to Fear]] |
||
| + | *[[File:DaysAcessory.png]] [[Space in Its Place]] |
||
| + | *[[File:DaysAcessory.png]] [[Flagging Winds]] |
||
| + | *[[File:DaysAcessory.png]] [[Ice Breaker]] |
||
| + | *[[File:DaysAcessory.png]] [[Down to Earth]] |
||
| + | *[[File:DaysAcessory.png]] [[Lose Your Illusion]] |
||
| + | *[[File:DaysAcessory.png]] [[Sighing of the Moon]] |
||
| + | *[[File:DaysAcessory.png]] [[Tears of Flame]] |
||
| + | *[[File:DaysAcessory.png]] [[Parting of Waters]] |
||
| + | *[[File:DaysAcessory.png]] [[Test of Time]] |
||
| + | *[[File:DaysAcessory.png]] [[Flowers Athirst]] |
||
| + | *[[File:DaysAcessory.png]] [[Stolen Thunder]] |
||
| + | *[[File:DaysAcessory.png]] [[Dying of the Light]] |
||
| + | |||
| + | ===Material Panels=== |
||
| + | :''See [[Item Synthesis]] for more information.'' |
||
| + | *[[File:Days Recipe.png]] [[Fire Recipe]] |
||
| + | *[[File:Days Recipe.png]] [[Fira Recipe]] |
||
| + | *[[File:Days Recipe.png]] [[Firaga Recipe]] |
||
| + | *[[File:Days Recipe.png]] [[Blizzard Recipe]] |
||
| + | *[[File:Days Recipe.png]] [[Blizzara Recipe]] |
||
| + | *[[File:Days Recipe.png]] [[Blizzaga Recipe]] |
||
| + | *[[File:Days Recipe.png]] [[Thunder Recipe]] |
||
| + | *[[File:Days Recipe.png]] [[Thundara Recipe]] |
||
| + | *[[File:Days Recipe.png]] [[Thundaga Recipe]] |
||
| + | *[[File:Days Recipe.png]] [[Aero Recipe]] |
||
| + | *[[File:Days Recipe.png]] [[Aerora Recipe]] |
||
| + | *[[File:Days Recipe.png]] [[Aeroga Recipe]] |
||
| + | *[[File:Days Recipe.png]] [[Cure Recipe]] |
||
| + | *[[File:Days Recipe.png]] [[Cura Recipe]] |
||
| + | *[[File:Days Recipe.png]] [[Curaga Recipe]] |
||
| + | *[[File:Days Recipe.png]] [[Elixir Recipe]] |
||
| + | *[[File:Days Recipe.png]] [[Megalixir Recipe]] |
||
| + | *[[File:Blazing Shard.png]] [[Blazing Shard]] |
||
| + | *[[File:Blazing Gem.png]] [[Blazing Gem]] |
||
| + | *[[File:Blazing Crystal.png]] [[Blazing Crystal]] |
||
| + | *[[File:Frost Shard.png]] [[Frost Shard]] |
||
| + | *[[File:Frost Gem.png]] [[Frost Gem]] |
||
| + | *[[File:Frost Crystal.png]] [[Frost Crystal]] |
||
| + | *[[File:Lightning Shard.png]] [[Lightning Shard]] |
||
| + | *[[File:Lightning Gem.png]] [[Lightning Gem]] |
||
| + | *[[File:Lightning Crystal.png]] [[Lightning Crystal]] |
||
| + | *[[File:Gust Shard.png]] [[Gust Shard]] |
||
| + | *[[File:Gust Gem.png]][[Gust Gem]] |
||
| + | *[[File:Gust Crystal.png]] [[Gust Crystal]] |
||
| + | *[[File:Shining Shard.png]] [[Shining Shard]] |
||
| + | *[[File:Shining Gem.png]] [[Shining Gem]] |
||
| + | *[[File:Shining Crystal.png]] [[Shining Crystal]] |
||
| + | *[[Image:Gear Component A.png]] [[Gear Component A]] |
||
| + | *[[Image:Gear Component B.png]] [[Gear Component B]] |
||
| + | *[[Image:Gear Component C.png]] [[Gear Component C]] |
||
| + | *[[Image:Gear Component D.png]] [[Gear Component D]] |
||
| + | *[[File:Combo Tech.png]][[Combo Tech]] |
||
| + | *[[File:Combo Tech+.png]][[Combo Tech+]] |
||
| + | *[[File:Combo Tech++.png]][[Combo Tech++]] |
||
| + | *[[File:Shield Tech.png]] [[Shield Tech]] |
||
| + | *[[File:Shield Tech+.png]] [[Shield Tech+]] |
||
| + | *[[File:Shield Tech++.png]] [[Shield Tech++]] |
||
| + | *[[File:Rune Tech.png]][[Rune Tech]] |
||
| + | *[[File:Rune Tech+.png]][[Rune Tech+]] |
||
| + | *[[File:Rune Tech++.png]][[Rune Tech++]] |
||
| + | *[[File:Power Tech.png]][[Power Tech]] |
||
| + | *[[File:Power Tech+.png]][[Power Tech+]] |
||
| + | *[[File:Power Tech++.png]][[Power Tech++]] |
||
| + | *[[File:Aerial Tech.png]][[Aerial Tech]] |
||
| + | *[[File:Aerial Tech+.png]][[Aerial Tech+]] |
||
| + | *[[File:Aerial Tech++.png]][[Aerial Tech++]] |
||
| + | *[[File:Range Tech.png]][[Range Tech]] |
||
| + | *[[File:Range Tech+.png]][[Range Tech+]] |
||
| + | *[[File:Range Tech++.png]][[Range Tech++]] |
||
| + | *[[File:Ankharite.png]] [[Ankharite]] |
||
| + | *[[Image:Luck Tech.png]] [[Luck Tech]] |
||
| + | *[[File:Iron.png]] [[Iron]] |
||
| + | *[[File:Bronze.png]] [[Bronze]] |
||
| + | *[[File:Dark Ingot.png]] [[Dark Ingot]] |
||
| + | *[[File:Silver.png]] [[Silver]] |
||
| + | *[[File:Gold.png]] [[Gold]] |
||
| + | *[[File:Mithril.png]] [[Mithril]] |
||
| + | *[[Image:Orichalcum.png]] [[Orichalcum]] |
||
| + | *[[Image:Moonstone.png]] [[Moonstone]] |
||
| + | *[[Image:Diamond.png]] [[Diamond]] |
||
| + | *[[Image:Adamantite.png]] [[Adamantite]] |
||
| + | *[[Image:Premium Orb.png]] [[Premium Orb]] |
||
| + | |||
| + | {{Stub}} |
||
[[Category:Kingdom Hearts 358/2 Days]] |
[[Category:Kingdom Hearts 358/2 Days]] |
||
[[Category:Game elements]] |
[[Category:Game elements]] |
||
Revision as of 08:33, 12 October 2010
Template:Game Template:Images
An optimal Panel setup.
The Panel System is the system in Kingdom Hearts 358/2 Days through which the members of Organization XIII upgrade weapons and stats, equip armor and accessories, gain abilities, and use Magic.
Description
The panels fit into a grid, which gains more slots by obtaining Slot Releasers. The grid can only contain one weapon panel and one ring panel. Otherwise, you can place as many of every other type as you wish (provided that they fit in the grid).
Each panel may take up a different amount of slots. These panels always have link slots, where certain panels can be placed to "link" with the main panel. For instance, if you place a Doublecast ④ panel, it takes up four spaces, three of which can have panels placed in. In this case, magic would be placed in the empty spaces, allowing you to cast each of those spells two times.
Weapon panels link with unit panels, which can have a variety of effects, from unlocking the abilities of the weapon, to increasing the weapon's attack, to increasing the chance of critical hits. Magic panels give you one cast for however many number of that magic you have equipped (if you have three Fire panels equipped, then you can cast Fire three times). When you have run out of casts, you must use an Ether to replenish them. Ability panels give you many abilities, such as Dodge Roll, Glide, and High Jump. Item panels can be equipped, but disappear when the item is used in the field. Level Up panels must be equipped in order to increase your level, and can be linked with certain panels to double, triple, or quadruple the level of the panels linked to it. Material panels aren't meant for use in the grid. By collecting material panels, you can use them at the shop to synthesize new panels.
List of Panels
Item Panels 
- File:DaysPotion.png Potion
 Hi-Potion
 Mega-Potion
- Ether
- Hi-Ether
- Mega-Ether
- Elixir
- Megalixir
- File:DaysUltralixir.png Panacea
- Limit Recharge
Support Panels
- Level Up
- LV Doubler ⑤, LV Doubler ⑥ (four configurations)
- LV Tripler ④ (three configurations)
- LV Quadrupler ③ (three configurations)
- Backpack
- Pack Extender ④
Magic Panels
- See Magic Panel and Magic for more information.
- Fire
- Fira
- Firaga
- Blizzard
- Blizzara
- Blizzaga
- Thunder
- Thundara
- Thundaga
- Aero
- Aerora
- Aeroga
- Cure
- Cura
- Curaga
- Magic LV2 ④ (three configurations)
- Magic LV3 ④ (two configurations)
- Magic LV4 ④ (one configuration)
- Doublecast ④
- Triplecast ③
- Quadcast ③
Ability Panels
- See Kingdom Hearts 358/2 abilities for more information.
- Dodge Roll, Dodge Roll ③
- Block ②, Block ④
- Aerial Recovery, Aerial Recovery ③
- Air Slide ②, Air Slide ⑤
- Sliding Dash, Sliding Dash ③
- Glide ③, Glide ⑤
- Haste, Haste ③
- High Jump, High Jump ③
- Treasure Magnet, Treasure Magnet ③
- Auto-Life ③
- Limit Boost
- Final Limit
- Scan
- Range Extender
- Auto-Lock
- Ultima Weapon
Weapon Panels
- See Gear for more information.
- Skill Gear, Skill Gear+ ②
- Technical Gear ③, Technical Gear+ ③
- Duel Gear ④, Duel Gear+ ④, Duel Gear++ ⑤
- Loaded Gear, Loaded Gear+ ②
- Chrono Gear ③, Chrono Gear+ ③
- Phantom Gear ④, Phantom Gear+ ④, Phantom Gear++ ⑤
- Lift Gear ③, Lift Gear+ ③
- Nimble Gear ④, Nimble Gear+ ④
- Wild Gear ③, Wild Gear+ ③
- Ominous Gear ④, Ominous Gear+ ④
- Valor Gear ②, Valor Gear+ ②
- Fearless Gear ③, Fearless Gear+ ③
- Prestige Gear ④, Prestige Gear+ ④
- Crisis Gear ⑤, Crisis Gear+ ⑤
- Omega Gear ⑥, Omega Gear+ ⑥
- Hazard Gear ⑤, Hazard Gear+ ⑤
- Rage Gear ⑤, Rage Gear+ ⑤
- Champion Gear ⑤, Champion Gear+ ⑤
- Ultimate Gear ⑥, Ultimate Gear+ ⑥
- Pandora's Gear ⑤, Pandora's Gear+ ⑤
- Zero Gear ⑤
- Casual Gear ②
- Mystery Gear ③
- Ability Unit Ⓛ
- Power Unit Ⓛ
- Magic Unit Ⓛ
- Guard Unit Ⓛ
- Sight Unit Ⓛ
Ring Panels
- See Accessory for more information.
- Sign of Resolve
- Brawl Ring
- Magic Ring
- Soldier Ring
- Fencer's Ring
- Fire Charm
- Flower Charm
- Strike Ring
- Lucky Ring
- Blizzard Charm
- White Ring
- Knight's Defense
- Raider's Ring
- Thunder Charm
- Recovery Ring
- Vitality Ring
- Rainforce Ring
- Double Up
- Storm's Eye
- Critical Ring
- Fairy Circle
- Full Circle
- Lucky Star
- Charge Ring
- Eternal Ring
- Carmine Blight
- Frozen Blight
- Safety Ring
- Princess's Crown
- Lunar Strike
- Crimson Blood
- Deep Sky
- Protect Ring
- Might Crown
- Critical Sun
- Three Stars
- Imperial Crown
- Witch's Chaos
- Rune Ring
- Extreme
- Master's Circle
- Nothing to Fear
- Space in Its Place
- Flagging Winds
- Ice Breaker
- Down to Earth
- Lose Your Illusion
- Sighing of the Moon
- Tears of Flame
- Parting of Waters
- Test of Time
- Flowers Athirst
- Stolen Thunder
- Dying of the Light
Material Panels
- See Item Synthesis for more information.
- Fire Recipe
- Fira Recipe
- Firaga Recipe
- Blizzard Recipe
- Blizzara Recipe
- Blizzaga Recipe
- Thunder Recipe
- Thundara Recipe
- Thundaga Recipe
- Aero Recipe
- Aerora Recipe
- Aeroga Recipe
- Cure Recipe
- Cura Recipe
- Curaga Recipe
- Elixir Recipe
- Megalixir Recipe
- Blazing Shard
- Blazing Gem
- Blazing Crystal
- Frost Shard
- Frost Gem
- Frost Crystal
- Lightning Shard
- Lightning Gem
- Lightning Crystal
- Gust Shard
- Gust Gem
- Gust Crystal
- Shining Shard
- Shining Gem
- Shining Crystal
- Gear Component A
- Gear Component B
- Gear Component C
- Gear Component D
- Combo Tech
- Combo Tech+
- Combo Tech++
- Shield Tech
- Shield Tech+
- Shield Tech++
- Rune Tech
- Rune Tech+
- Rune Tech++
- Power Tech
- Power Tech+
- Power Tech++
- Aerial Tech
- Aerial Tech+
- Aerial Tech++
- Range Tech
- Range Tech+
- Range Tech++
- Ankharite
- Luck Tech
- Iron
- Bronze
- Dark Ingot
- Silver
- Gold
- Mithril
- Orichalcum
- Moonstone
- Diamond
- Adamantite
- Premium Orb